11 August 2010
Georeferencing - making historic maps spatial
Sure, we all love the look of cool historic maps. Although hand drawn cartographic flourishes may be mostly things of the past, Geographic Information Systems can bring old maps to life. By adding spatial smarts called georeferencing, historic maps can play nicely with their cartographic descendants, GIS layers. So let’s review the process to georeference historic maps step by step.
Steps
-

Cool Historic 1907 Sanborn Map Cool historic map, meet Mr. Scanner. Scanned, photographed, or downloaded from an online source, you need a digital version of your map. Most all image formats are fair game. You’ll find .jpg and .tiff are two common formats. If your map is only available as a .pdf, convert it to a .jpg or .tiff, then proceed.
-

Basemap You need an accurate basemap that’s already georeferenced and covers the same area as your historic map. Street centerlines or aerial photos can make great basemaps. Often you can find what you need online. If you're stuck, make friends with your local GIS expert. They will direct you to a winning basemap.
-

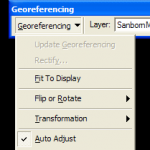
Georeferencing Toolbar Start ArcMap and turn on the Georeferencing toolbar. On the toolbar, click the down arrow to be sure Auto Adjust is checked. Add your basemap and zoom to the approximate extent of your historic map. Now add the historic map. Don't see your map? No worries, just click the down arrow on the friendly Georeferencing toolbar and choose Fit To Display and you’ll be face to face with your historic map.
-

One control point - maps start to align Back on the Georeferencing Toolbar, click the Add Control Points tool, find a location that’s easy to spot on the historic map and click it. Turn off your historic map layer (uncheck it in the table of contents). With the Add Control Points tool active, find and click that same location on the basemap. When you turn on your historic map again, you’ll see these two points automatically snapped into alignment. You just created your first control point!
-

Success! Our historic map georeferenced to the basemap. Add at least three control points. You’ll see the historic map move into better alignment with each new control point. If you make a mistake, use the View Link Table button to show all your control points and choose one to delete. Like the way things look? On the toolbar, click Update Georeferencing to save your work.
Tips: Try to find control points spread all around your map. Generally, more control points with wide distribution = better alignment. With layer transparency you can see both maps-Right click the historic map layer, then Properties/Display/Transparency.
-

Our cool historic map has a few new friends. Behind the scenes, the GIS with great stealth has stored your georeferencing work in new files that are partners with your cool historic map and reside in the same folder. Keep all these files together in one folder and GIS software will forever align your historic map with other georeferenced layers.
Learn more
The hardest part Íof becoming a georeferencing guru can be all the zooming, panning, and turning on and off layers to find those common points between the two maps. As you gain confidence in your skills, this map navigation becomes much easier. You’ll hear folks say georeferencing is part science and part art. The art often lies in interpreting multiple maps to sleuth out common control points.
Of course, these techniques work for any scanned map, not just the cool historic variety. To learn more about the value of georeferenced historic maps and additional georeferencing tools and techniques check these links:
- Historical Maps in GIS by David Rumsey and Meredith Williams
- Georeferencing Video from ArcGIS online help
- Georeferencing A Raster Dataset from ArcGIS online help
- Video: Georeferencing Tutorial for a Graduate Digital Humanities Course by Ryan Cordell

